Friday, February 16, 2018

The 3-2-1 Method aka The Texas Crutch


Around the BBQ Pit you'll hear lots of heated discussions about the 'Texas Crutch". You may have heard of it's more common name, the 3-2-1 Method. I'm not keen on the term "Crutch" because it implies that I am somehow unable to "walk" without assistance.  BBQ purists don't believe in this sort of "cheating". I disagree.  Listen, the object of the game is to produce a tender,juicy rack of ribs for your family and friends to enjoy. That's it. I don't think it really matters how you get there.

The same goes for your cooking medium. I am absolutely a die hard fan of the Old School for my BBQ- charcoal and wood only for me - but I don't begrudge anyone for choosing more reliable and less labor intensive equipment  that doesn't involve a charcoal or wood fire that needs constant tending You like gas or electric? You're a fan of the "pellet pooper"? More power to you! Just make good BBQ!

Regardless of the cooking medium, the key to a good rack of ribs is "low and slow". Ribs are, by nature, not tender cuts of meats and the low and slow process allows the connective tissue to break down and become tender.

If you've struggled with ribs not coming out tender or if you just want a guaranteed "fall off the bone" tender rack of ribs, give the 3-2-1 Method a try.

It's a simple process.  The numbers stand for hours of cook time.  3= three hours with the ribs directly on the grill. 2= two hours wrapped in foil and back on  the grill. 1= one hour with the ribs out of the foil and back on the grill.

Start out by trimming a rack of ribs and removing or scoring the membrane on the back.

Step two usually invokes another heated discussion among Pit Masters - using a "glue" to hold the rub to the meat. I used regular yellow mustard. Surprisingly enough, the mustard taste disappears during the cooking process, so you don't have to worry about your ribs tasting like a hot dog when they're done. I've rubbed my ribs without mustard and it works just fine too. Mustard -no mustard- you decide.

Once your rack of ribs is trimmed and ready for rub, get to rubbin'! Here's a link to a really tasty Sweet and Smokey Rub we use.  Some cooks rub just the top, while others coat the entire rack. I am in the latter camp.  Don't be shy with the rub.

Okay, ribs are trimmed and rubbed. I let mine rest in the fridge while I get my smoker fired up.  Bring your smoker up to your favorite low-n-slow temp. I run my smoker between 225 F and 250 F for ribs, regardless of whether I'm wrapping or not.  Once you get your smoker up to temp, throw on the ribs.


Keep your temps between 225 F and 250 F with a nice thin blue smoke. We use a variety of smoking woods. Personally, I am a big fan of hickory but, apple, pecan, oak and cherry are also excellent for ribs. The only wood you won't hear me recommending is Mesquite. Folks from the Southwest will probably give me grief, but Mesquite is far to strong a smoke flavor for me. I have sworn off Mesquite, but if that's your thing, be my guest and use Mesquite.

After adding the ribs to the smoker, set your timer for 3 hours and let her buck! Once you hit the three hour mark, pull the ribs from the smoker and completely wrap them in foil. You'll probably need two layers, but make sure it's nice and tightly wrapped. Before closing the foil wrapper, add some moisture. We've tried Cola, honey, butter (real and squeeze margarine), honey & butter, Doctor Pepper and Apple Juice.  Try your favorite. The flavor wont be affected much, but the moisture will help produce super tender ribs.  Be sure to not go over 1/4 cup. This part of the process is basically going to steam the ribs in the foil. More liquid=more steam=big mushy mess of meat. A 1/4 cup is plenty (or a good squeeze of margarine or 3-4 tablespoons of butter).  Once that's done, seal up the ribs in your foil and get them back on the smoker for another 2 hours.

This part of the cook is where I struggle. If this is your first try with the 3-2-1 Method, I’d suggest you just follow the plan and let the ribs cook for 2 hours in foil at 225-250F. You can be almost guaranteed that after 2 hours in the foil your ribs will be super tender. I’ve never had a rack come out NOT tender, doing it this way. The problem is that after two hours the ribs are usually “fall off the bone” tender. Most people would be thrilled with meat that tender. I’m trying for ribs that bite clean off the bone with just the slightest pull. There’s nothing worse than taking a bite of a rib and having the entire rib meat come off the bone with your bite. If you like “fall off the bone” , leave the ribs in there for 2 hours. If not, you’re going to need to do some trial and error until you find the right time. Personally, I find 1.5 hours is plenty, but your experience may vary.

When the 2 hours alarm goes off, remove the ribs from the smoker/grill and carefully remove the rack from the foil. I say carefully, because there’s a good amount of liquid in the foil and it’s HOT! Yes, I know this from experience. Be careful!

Remove the rack from the foil and right back onto your smoker/grill for one more hour at 225-250F.
After about 15 minutes you can brush on your favorite BBQ sauce. Here’s a recipe for my Big Ricky’s BBQ sauce , if you’re looking for a good, easily adjusted BBQ sauce recipe. I add another layer after about 30 minutes into the last hour. This last hour helps the BBQ sauce to set up and the ribs to develop a crust of sorts. Depending on how the ribs came out of the foil, a whole hour may not be necessary. Again, try it as described on your first run and then adjust the times, temps and sauce/no sauce to your liking.

Never mind the naysayers. Everybody wants tender, flavorful ribs, but that takes practice. The 3-2-1 Method will get you there every time, without fail.

*Note- the 3-2-1 Method is good for St. Louis Style Ribs. For Baby Back Ribs, shorten it to 2-2-1. 


Wednesday, February 14, 2018

A little twist on the classic sandwich - The Reuben Fatty


If you've followed any of our BBQ escapades, you'll be all to familiar with our obsession with the "Fatty". I spend probably more time than I should thinking about what kind of stuffings I can wrap around what kind of meats. One of my latest ideas is a pasta & sauce filled Italian Sausage fatty. If it's successful, I  think I'll name it "The Italian Stallion Fatty", but I digress.

Today's Fatty was born from my darling wife's love of corned beef. We gave it some careful consideration (maybe 10 minutes before I said "HECK YEAH, LETS DO IT!") and beat feet to the market for supplies.

I am not a man of details, I'm sad to say. So you'll forgive me when I tell you things like we used a "normal" corned beef. What are those? Two to three pounds? I don't know. I just grab it and go. Maybe that's why my wife doesn't let me shop by myself?

Anyway, back to the Reuben Fatty. We took a 2-3 lb corned beef from the supermarket and we ran it through the meat grinder, using a course grind die.

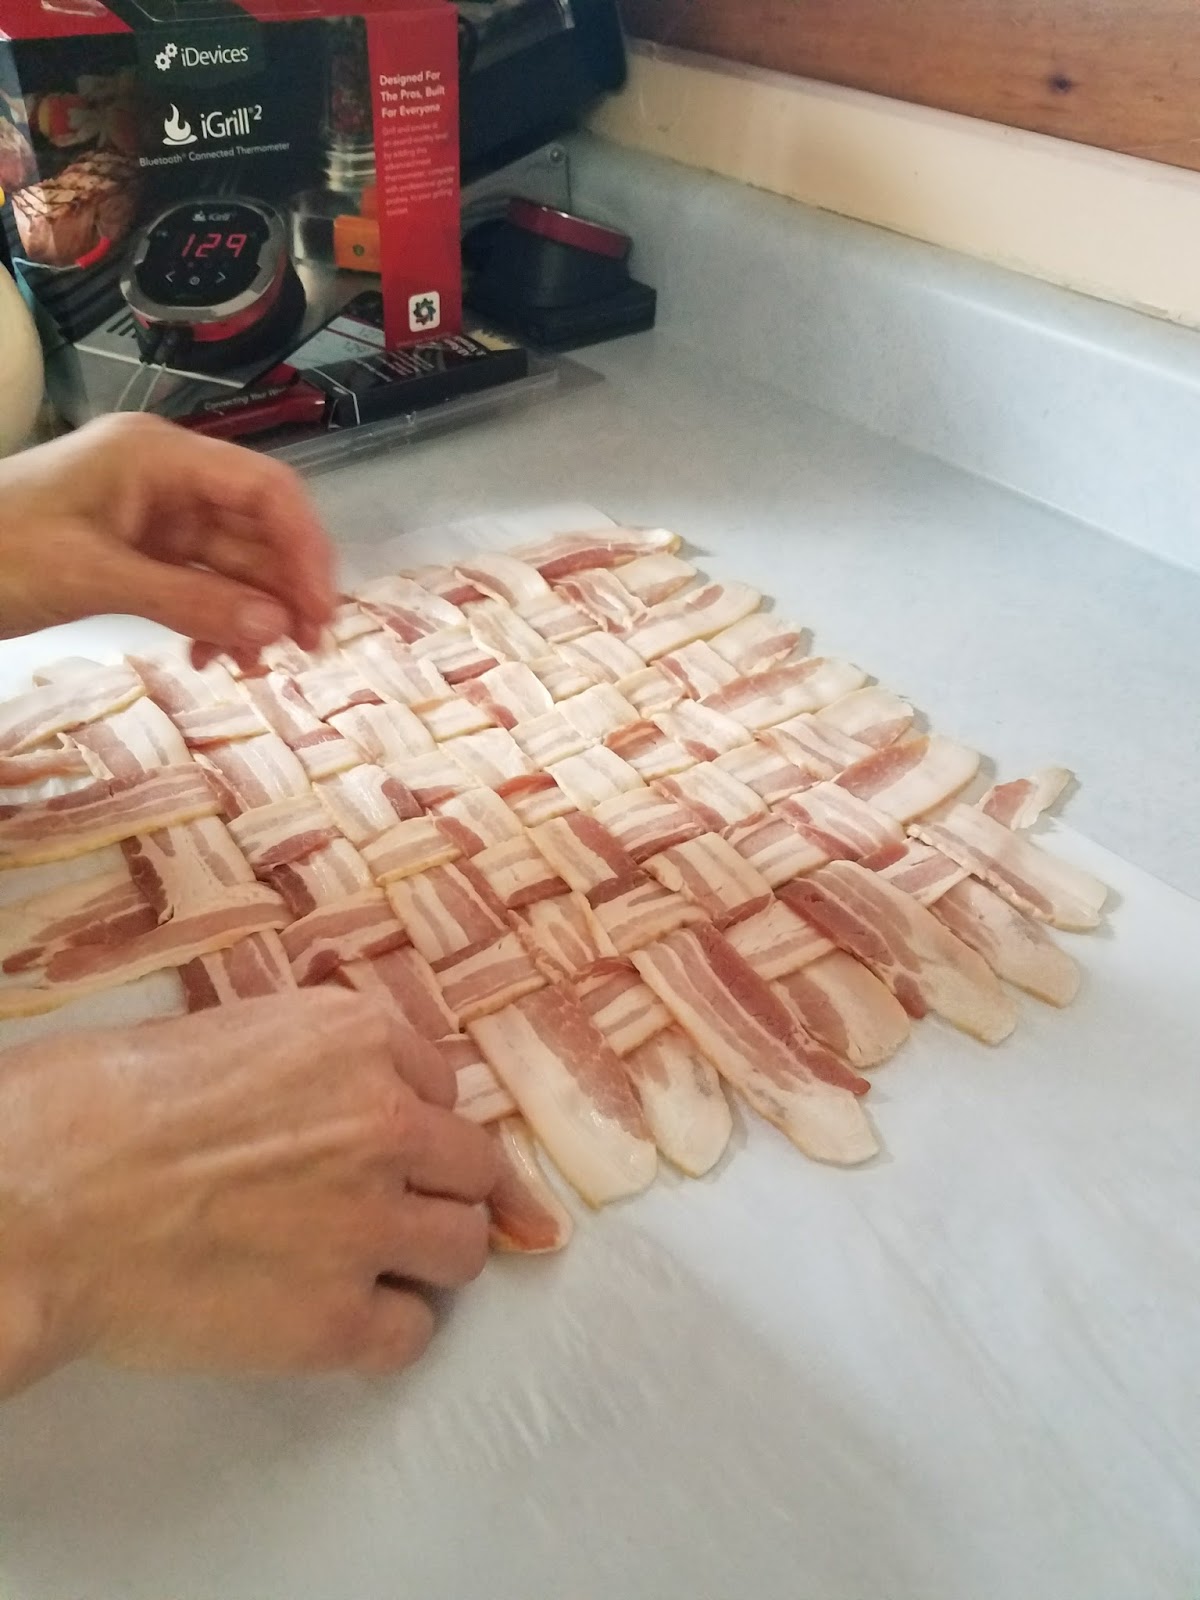
Step two was to lay out a bacon weave to wrap the fatty up. Be sure to make your weave on parchment or butcher paper. It will be much easier to roll, trust me. Once your weave is complete, simply pile your ground corned beef onto the weave and begin to press it out into a big rectangular patty.

Note- This Fatty was created a while ago, when my Bacon Weave game was -shall we say- non-existent. I have since conceded my lack of weaving skills to my wife. She has become the master of weaving the bacon in our house.


You'll notice the "bacon wings" on the left and right. That's my idea to have bacon to cover the sides. If you do a proper bacon weave and leave an inch or so of bacon showing on all sides, you don't need to add the "wings".


Once you've got your meat formed on the bacon, add about 8-10 slices of Swiss cheese and then a pile of Sauerkraut right down the middle of the corned beef. I can't tell you why the picture below doesn't have cheese on it. I'm not sure what I was thinking when I took the photo. Anyway, imagine a layer of Swiss Cheese slices in the photo below.


Now that you have your cheese & Sauerkraut laid out, it's time to wrap. The parchment paper will be a huge help in holding everything together. If you're familiar with making sushi, think bamboo mat. Parchment paper is the bamboo mat of Fatty making.

As I said in the beginning, I cannot weave bacon, so don't judge my mess. Just relish in the fact that it's covered in BACON!


Once you've got the fatty wrapped up tight it's time to cook. Be sure to adjust the bacon so that the entire Fatty is covered and there is no (or very little) corned beef showing.  We cooked ours at about 275F for about 1-2 hours (until the bacon is cooked to your liking). We used just oak on this one, as I wanted a lighter smoke taste (and I didn't feel like running to Lowes for a bag of Hickory chunks).

                                                                      Almost done!

                                                              The finished product

Once it's cooked to your liking, pull it from the heat and let it rest for  10 minutes or so.

We sliced ours into 1 inch slices and served them on grilled Pumpernickel/Rye Swirl bread w/ a stone ground mustard. They were fantastic!


Tuesday, February 13, 2018

Beer Can Burgers


I've said it before, but I'll say it again. I am not the most creative person on  the planet. I have a hard time coming up with "good" ideas -food wise- on my own. Thank the BBQ Gods for Social Media! Between Facebook, Twitter & Instagram I now have an encyclopedia of different recipes to try! 

A while back, one of the big deals on the innerwebs was the "Beer Can Burger". Of course, we had to try it! 

We started out with some 80/20 ground beef. I like lower fat on these burgers because the bacon adds plenty. Make no mistake, these burgers are meant to be over the top! We used about 8 ozs of meat per burger. 

Don't let the name fool you. It's not mandatory to use a beer can. In fact, if you want to be completely correct, ours would be called Coke Can Burgers. 😉

Be sure you wash your can first (and your hands, but you should already know that!) . Then take your meat and form a big meatball. Once you have a nice round globe of meat, grab your can and press it down onto the meatball and begin forming the meat around the can. The idea is to create a vessel where you get to add piles of extra stuff (we'll get to the extra stuff in a minute!)

Once you have a nicely formed meat vessel, wrap each one with two slices of thin bacon. As usual, bacon is the Duct Tape of BBQ - bacon holds it all together. 


Once your burgers are formed, you can begin to think about the extras - the filling. We filled these Beer Can Burgers with sauteed mushrooms & onions, crumbled bacon and shredded cheddar cheese. The beauty of these monsters is you can fill them with anything! I've stuffed a cup of creamy Mac & Cheese in there, a pile of chili, pulled pork, shredded beef, just veggies (GAH!). You're only limited by your imagination. 


Once you've got the burgers filled with your favorite stuffing, add a nice pile of shredded cheese to the top and fire up the smoker!

We smoked these beauties at around 275 for an hour or so. We used Apple wood smoke. 

If you haven't tried a Beer Can Burger yet, be sure to add it to your summertime BBQ menu this year. Your guests will never forget!


Tuesday, February 6, 2018

The Chicken Cordon Bleu Fatty!


While strolling down the memory lane of my Google photos this morning, I came across a handful of photos from a cook we did last summer. A couple of years ago, my buddy Matt turned me on the the Bacon Explosion. This was our first foray into the world of the BBQ Fatty!

Once my wife mastered the art of the bacon weave, we decided we needed to figure out how many different Fatties we could come up with. One of our successes we called the “Chicken Cordon Bleu Fatty”. It goes something like this….


Ingredients

1 lb thin sliced bacon
8-10 boneless skinless chicken breasts
½ lb sliced ham
½ lb sliced Swiss cheese
Salt, pepper, garlic (to taste)

Step 1
First things first...flatten the chicken. Pound them out to about ½ in thick.

Step 2

The magnificent Bacon Weave. Check out our video on making a bacon weave.(coming soon!)


Step 3

Arrange the flattened chicken breasts out on the bacon weave. Make sure to arrange in such a way as to leave some bacon showing on all four sides. This will allow you to seal the roll with bacon when we roll it up. Throw on some SPG, to your taste.


Step 4

On top of the chicken arrange a layer of sliced ham


Step 5

Atop the ham goes a layer of Swiss cheese.


Step 6

The Wrap! This is the tricky part. We normally make our bacon weaves on a piece of parchment paper. It is much easier to roll the fatty when parchment paper is involved. Start with one side of the bacon weave and slowly & steadily start rolling. Like I said above, you’ll want to leave a good inch of bacon showing all the way around so you can seal up the fatty once it’s rolled up. Make sure to arrange the bacon so it covers up the entire roll.


Step 7

On our first one we added a basic rub to the bacon before cooking. Here’s a link to my basic rub recipe. This step is optional.

Step 8

Cook it! We smoked ours on the offset smoker using Oak and Hickory. I kept the temp up around 275-300F until the probe hit an internal temp of 160. My memory is a little fuzzy, but I want to say it took about an hour or so. (Full disclosure – BBQ has taught me to not pay attention to time as much as temp. “It’s done when it’s done” is my motto these days.)

Once you hit 160F internally, pull it from the heat and let it rest for 10 minutes of so. Then slice and enjoy the Chicken Cordon Bleu Fatty!


Sunday, February 4, 2018

Cast Iron Cooking - The Dutch Baby


I’m sitting at my computer desk, looking out the window at my pit covered in snow and ice. It’s February 4th and we’re smack dab in the middle of winters icy grip.Woo hoo! My favorite time of year! (/sarcasm off).

It’s been a rough winter so far. The cold, snow and ice combined with my ailing knees and back has basically shut down Big Ricky’s Smoke Shack until spring. It bums me out when days like today come around -Superbowl Sunday! I should be out there banging out Jalapeno Poppers and a rack of ribs for the big game. But instead, I’m sitting here looking out the window and longing for warm weather so I can get back outside and smoke some meat!

While I haven’t been in the pit for a few months, I have been able to play around with a couple of Cast Iron pans. My beautiful bride presented me with an awesome 10 inch Cast Iron pan for Christmas this past year. Thank you sweetie, I love it!

It’s not BBQ, but I’m really starting to enjoy cooking with CI in the oven and stove. I can’t wait to get some practice on the open fire this summer. 

Last weekend, I saw a photo on Facebook, in a CI group I belong to, for a “Dutch Baby”. If you’re not familiar, a Dutch Baby is basically a big airy pancake. While it can be made in a number of different pans, the CI pans seem to return the best results.

The Dutch Baby is a simple recipe made from eggs, flour, milk, butter,vanilla and sugar -I’ll provide the recipe we followed below.

There are a couple of keys to successful Dutch Baby I found. The first thing is the eggs and milk need to be at least room temperature. I float the eggs in some warm water for 10 minutes or so and microwave the milk for 20-25 seconds. The second key is the pan needs to be hot. A hot Cast Iron dutch oven or frying pan will give you a super nice crunchy and browned outside.

The Dutch Baby is cooked at a temp of 425 F for about 25 minutes. It will blow up like a pillow, but DO NOT OPEN THE OVEN DOOR! It’s going to collapse once you pull it from the oven – peeking early will collapse it early...DON’T DO THAT!

There’s a variety of ways to serve a Dutch Baby. Many people will add apples, berries or other fruits. Some, like me and the missus, prefer Maple Syrup, while some just like a sprinkle of powdered sugar or cinnamon sugar.

If you asked me to describe a Dutch Baby, i’d have to say it’s like a popover, a waffle and a piece of French Toast all rolled into a delicious, light and airy treat that’ll make a great addition to your weekend breakfast or brunch (or dinner, if you fancy breakfast for dinner!)

Here’s a simple recipie for Dutch Baby. We used a 10 inch CI pan.

Ingredients

3 Eggs
½ cup AP Flour
½ cup Milk (we used 2%)
1 TBSP Sugar
Pinch of Nutmeg
2 tsp Vanilla extract
4 TBSP Butter

Syrup, preserves, confectionery sugar, Nutella, your favorite topping


Step 1
Put your pan in the oven and preheat your oven to 425

Step 2
Combine eggs, flour, milk, sugar and nutmeg in a blender jar and blend until smooth. Batter may also be mixed by hand.

Step 3
Place butter in a heavy 10-inch skillet or baking dish and place in the oven. As soon as the butter has melted (watch it so it does not burn) add the batter to the pan, return pan to the oven and bake for 20 minutes, until the pancake is puffed and golden. Lower oven temperature to 300 degrees and bake five minutes longer.

Step 4
Remove pancake from oven, cut into wedges and serve at once topped with syrup, preserves, confectioners' sugar or cinnamon sugar.

Sunday, October 8, 2017

Even the name is a mouthful! The Jalapeno Popper stuffed Bacon Cheeseburger Fatty!


In our quest to try every fatty combination on the planet, we recently came up with another winner. The Jalapeno Popper Bacon Cheeseburger Fatty!

This idea was actually suggested by a friend through one of those mesmerizing food videos that flood social media. A lot of our cooks come that way, through videos that look challenging or fun to try.


One of our favorite snacks has become smoked jalapeno poppers. I've been making a batch almost every weekend for months it seems! This fatty idea takes the popper to  a whole new level.


We started out with a couple of finely diced jalapenos (seeds & veins removed) and a small onion also finely diced. We sauteed them until the onions were translucent and the peppers slightly tender. After a quick chill in the freezer we added the diced onions and peppers to the softened cream cheese and a big handful of shredded cheese (we used Jack cheese, but whatever you like is fine).  

After a good mix of the veggies & cheeses we dumped it out on a piece of plastic wrap and formed it into a cheese log. We wrapped it up tight and tossed it in the freezer to firm up- about an hour.


Once the cheese log firmed up we rolled out a layer of hot italian sausage, about a ¼ inch thick and a rectangle maybe 4 inches by 8 inches - enough that we could completely wrap the cheese log. Be sure to pinch the seams together so there are no escape routes for the cheese to find when it melts -cheese blowouts are not pretty. Once the log was wrapped we tossed it back in the freezer to firm up again.

While the sausage/cheese log was chilling, we rolled out another sheet of hamburger. We left the burger plain, but you could certainly add your favorite seasonings if you want. The burger was rolled out to a aprox ½ inch thick rectangle about 5-6 inches by 9-10 inches- again, big enough to completely wrap the sausage/cheese log.

Once the burger was rolled out we added a layer of BBQ sauce followed by 9 slices of cheese (we used provalone. next time American). We then laid the sausage/cheese on the burger and wrapped it all up into a big log of love!

The final step, before smoking - the piece de resistance- is the bacon weave. It's like a snuggly bacon blanket that wraps the whole fatty up into a beautiful package. It took the wife a couple of practice runs, but she's become a bacon weave pro!


We fired up the UDS with some charcoal briquettes and hickory chunks. I smoked this fatty at about 230-250 F for about 3 hours, flipping it over about ½ way through.  I would suggest a higher temp though. Next time we’ll run in the 275 -300F range. The meat cooks pretty quickly; it's the bacon that takes time to brown, but you need to cook it fairly slowly or it will burn and curl. higher and not so slow next time.


This fatty was pretty easy to make, although it did take some time preparing. Definitely one we`ll do again soon!


Sunday, April 9, 2017

Back in the saddle!!

After a winter of recovering from back surgery, I’m so happy to finally be able to get back to BBQ! I decided to jump right back in this weekend, so I called my sister and invited her and my niece down for a Red Sox game on the tube and some  lip smackin’ BBQ!

In northern New Hampshire, Mother Nature has little interest in cooperating with our outdoor plans and Saturday was no exception. I looked at the weather forecast Friday night, hoping to find some good news, but no. Cold and snowy was the forecast du jour.

We woke up to find another Winter Wonderland! An inch of snow had fallen overnight and it was still snowing and blowing. I was a little discouraged, but I’ve been inside for far too long! So, I kissed my bride goodbye and sent her off to work and moved the Ugly Drum Smoker out to the driveway and lit up a chimney of charcoal.


Normally, I will moan and groan through winter BBQing and smoking - I HATE IT! - but I love to cook so I suffer through. This time however was different. I have been out of the game so long, I was chomping at the bit to get outside and fire up the smoker!  


The menu for dinner was pulled pork sandwiches, cole slaw, baked beans and cornbread. I know, that's way too much starch. carbs, whatever...but so what? I`m not trying to make diet BBQ here!

Friday night we trimmed up a nice 8-9 lb boneless Boston Butt and injected some extra flavor. Here’s my “go-to” liquid recipe for pork butt:


3/4 cup apple juice
1/2 cup water
1/2 cup sugar
1/4 cup salt
2 tablespoons Worcestershire

Basic and mild, but I think it adds a hint of flavor and extra moisture for the long cook.

Normally, I will rub the meat the night before and refrigerate, but i was tired so I waited until Saturday AM. I got the butt on a little later than I had hoped, but by 10AM, the smoke was rolling and the butt was cooking. Here’s a basic pork butt rub I make that can be easily customized to your tastes:

Big Ricky’s Butt Rub
Ingredients:
1/4 cup Paprika
1/8 cup Fresh Ground Black Pepper
1-2 tablespoons Garlic Powder
1-2 tablespoons Onion Powder
1 tablespoon or more Cayenne Pepper
1/4 cup Coarse Salt
1/4 cup Brown or White Sugar (I use Turbinado sugar)


We smoked the butt for 8 hours, until it hit 205F. I maintain temps between 220F and 240F in the UDS and, this time, I used Hickory for my smoke (Kingsford briquettes for my heat). I still haven’t gotten my time management down to where I can let the butt rest for any length  of time. As it was, we didn’t eat until 8PM! I guess I need to get going even earlier next time.

One of my favorite things is seeing a well cooked pork butt. If it’s done right, it will  like  jello. We pulled the butt and watched it jiggle and dance all the way into the kitchen.

While the pork butt rested, me and Les put together the cornbread. A big kudos to Demetra Overton for this recipe! it is FANTASTIC! Click on the link  to check out the recipe and her other great looking dishes (her Vidalia onion cornbread is going to be made soon too!!)


Here’s our results. It was a huge hit!!


I'm super happy to be walking upright and BBqing again! It looks like winter is on the run and warmer weather is here. I`ve knocked off the rust and am ready to dive back into the pit! Stay tuned, lots more to come!