Sunday, September 13, 2015

Labor Day Weekend and a reason to celebrate


Labor Day weekend marks the end of summer  - and the end of BBQ season - for many people,but not us! I'm already working on plans on how to insulate my smoker so I can continue smoking right through the frigid New Hampshire winters. Last winter it was rough keeping temperatures up in the offset smoker and the vertical smoker so I need something I can easily insulate. 

The UDS-Ugly Drum Smoker - hit my radar about a year ago while flipping through Youtube. While my first thought wasn't winter smoking with the UDS, it oocurred to me along the build that I could easily wrap it in a welding blanket or maybe a hot water heater insulator sleeve to keep it insulated from the cold winds of the northeast . I'll update when the cold sets in and I've decided which way i'm going to go.

The main reason for building the UDS was actually twofold. First, it fueled my love of making gadgets. Granted, its a pretty big gadget but a gadget in my mind nonetheless. Reason two was the numerous claims of long long long and low smokes wih minimal intervention.

The plans I found were simple and easy to follow. I am by no means a craftsman and I really work better when I have step by step instructions. There are a bunch of guides on Youtube that make it a breeze for even a backyard hack like me.

I started out finding some barrels on Craigslist. They weren't food grade, but they held latex paint so I was ok with them. Unfortunately, I found out after I was done building that I have a family connection to an unlimited supply of food grade barrels.  I guess i'll just have to build a few more!

I picked up the barrels back in August, but had to put them aside for  a few weeks until I had a weekend to get started. Finally about 3 weeks ago I got going. 

I burned out the barrel using slats from some old wood fencing we had. I had it going like a blowtorch! It took maybe an hour to burn the bulk of the exterior paint off. At that point I had to lay it down and start to rotate it to burn off the bottom third. Another hour later and the outside of the barrel was completely burned off. 
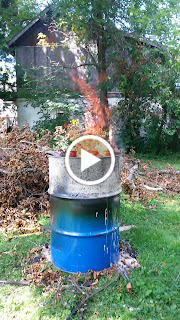


After the burn I let the barrel cool and emptied the ash out. I grabbed a scrub brush and a bucket of soapy water and gave the exterior a good scrub and then blasted it with the power washer. The outside was right down to bare metal, it was beautiful!


The inside however, that was a whole other story. After scrubbing and blasting with the power washer I realized this barrel had the dreaded "red liner" I had heard about. No big deal, I thought..I'll just grab my drill & wire cup brush and zip that liner right off. Boy  I couldn't have been more wrong! This liner - epoxy, or some other hard as steel lining, was not coming off so easy - even after 2-3 hours of 900 degree fire! It took me hours to just get the top third of the barrel & the lid clean and even then it wasn't comletely clean of the red liner. Finally I gave up and followed the advice of the builders  before me. I made arrangements with a co-workers husband to have him sand blast the inside of the barrel.


Before-using a wire wheel & a flap wheel sander. It was going to take forever!
After- 20 minutes of sandblasting and it's down to bare metal and ready for seasoning!

Once I got the barrel and lid back from sandblasting, I gave it good scrub and pressurewash to remove any leftover residue. It was a nice hot summer day so the barrel dried in minutes. 

Since I didn't have the time or parts to finish the build, I gave the inside of the barrel a nice heavy coating of spray on cooking oil. This served two purposes. Namely it prevented the bare steel inside from rusting. The second purpose was to season the inside of the barrel, just like a cast iron pan.  To avoid rust on the outside, I gave the barrels exterior a coat of high temperature black paint. After it had time to dry, I put it back on the porch to wait for my next day off. 

During the week I made a few trips to the local hardware store & home improvement centers to pick up my supplies. For those who are interested, I'll post a link to a CAD drawing and parts list at the end of this post. 

I stopped by a local metal shop a few weeks ago and showed the guy the CAD rendition of the fire basket from the plans I found online. He figured building me a custom firebasket would run me about $80.00. That wasn't to bad in my opinion, i'd have a nice solid, professionally welded firebasket, but that's kind of against the spirit of the UDS build. So, I went with Plan B..I found some plans online and built my own for about $30.00.

Firebasket almost complete.


I found sheets of expanded metal at Home Depot that I could use as is and I scavanged an 18 inch grill from an old BBQ. I gently bent the expanded metal around a propane tank to make uniform curves and I joined the two pieces together with 1/4-20 stainless machine bolts & fender washers. I secured the basket to the grill using bailing wire every few inches. For an ash pan I attached three 4 inch carriage bolts to the bottom of the basket and a large (18 inch)pizza pan, again using fender washers to secure the bolts to the bottom of the basket. I allowed 3.5 inches of space between the basket bottom and the pizza pan to allow for good air flow under the coals. I later found a handle from an old bucket that fit perfectly and allows me to grab the basket with a hook and remove it or put it in the smoker while still hot. The basket turned out sturdy and will easily hold 10 plus pounds of charcoal, which should be more than enough for 8-9-10 hour smokes. 

With my firebasket complete, I moved back to the barrel. I had applied a couple more coats of black high temp paint to the outside so I started measuring and marking spots to drill holes. I punched three additional 1 inch holes aruound the bottom (2" up from the bottom edge) and dropped in 4 black pipe nipples. On the two side nipples I added two 3/4 inch ball valves and on the front and back nipples I simply added pipe caps. The front nand back caps are removed to get the smoker up to temperature. Once I've got the temp I want, I can close those two vents down with the pipe caps and regulate the air flow with the ball valves. 

Now that I had my air flow IN, I needed a way to get the smoke OUT. For that, I drilled two one inch holes in the lid and installed 2 3/4 inch black pipe elbows. Why elbows, you ask? Simple..to keep the rain out! I later found that two holes was not enough and had to punch two more holes in the lid after the first smoke. The results were much better!

I added two 22 inch weber grates; one at 7 inches below the lid and the other at 12 inches. The lower grill sits about 15 inches from the top of where 10lbs of charcoal will sit. I havent determined yet if I need a heat baffle to cook on that lower grill or not. For now, it's a great place for a drip pan and/or water pan. I also added a thermometer between the 1st and 2nd grills. 

After adding all the hardware I gave the UDS a test burn, mainly to cook that non-stick spray to the walls and season my smoker. I had to go to work , but Leslie sent me text message reports every hour or so, showing me the temperature was staying constant for hours and hours! I was very encouraged! I had filled the basket with about 10 lbs of charcoal and dropped it in around 11AM. I got reports until about 7PM and it stayed between 200 and 30 degrees that whole time . When I got home at 9:30 the fire had died down but was still warm and I could have gotten it fired back up if I wanted! Since it was late, I decided to let it just die out on its own. To my surprise, the next morning there was easily 2 lbs of charcoal left unburned! 

For our trial run we cooked a couple of racks of ribs, one for us and one for the guy (and his family) who saved me hours of tedious grinding. I added 9lbs of charcoal to the basket and shoveled out the center. In BBQ parlance it's referred to as the "minion method" - essentially allowing the coals to burn slowly and outwardly for a long, long period of time. I scattered about 6-7 chunks of hickory through the coals, put the ribs on and closed the lid.  I was able to maintain 250 degrees for then entire cook with only a littlle adjusting, as I get more familiar with how this smoker works.


It was a great Labor Day weekend and we had reason to celebrate! I'm super pleased with how my first UDS came out and I'm already thinking about how to build the next one - which, by the way, Leslie has claimed as her own. 

Summer may be over, but BBQ season will roll on!

Ready to smoke!

I may add some color to it and put it on wheels later, but for now it's done!


Great easy plans to build a UDS

(also an awesome site for all things BBQ!)


Monday, August 24, 2015

The gift that keeps on grilling

So I don't know if I've ever mentioned this in any of my posts, if I have forgive me cause I love to give a shout out to how wonderful my husband is and if I haven't...well let me tell you now that he is a KEEPER!!  I am extremely lucky to have him in mine and my sons life. 

I had a nice little surprise for me when I got home from work the other day.  He had found a little grill at our local hardware store for $15...That's it!!  I guess I'm not too hard to please cause I  pretty smitten with this little unit.  It's smaller, but there are some nights when I am only cooking for the 2 of us and we don't need all the room.

What to cook?? What to cook??  Hmmmmm. Someone had suggested kabobs when I posted a picture on Facebook.  And that was it..... Kabobbies it was!!
We soaked our wooden skewers in water while cutting up our vegetables.  We also marinaded out chicken and our steak for a few hours before cooking.
We used summer squash, zucchini. Mushrooms, cherry tomatoes, red onion, and a red & green bell pepper.

We were able to fit 4 on this little grill at a time, which isn't too bad.  We had 8 to cook.
These kabobs came out soooo good!!
Don't be afraid of a little black, or burn on your meat and veggies... That's what gives it all the flavor!!
So make sure your grill is nice and hot.  Cook for about 20-30 minutes and turn about every 10 or so, so they get a nice even cook all the way around.
These were so delicious.  Use your favorite marinades for your meats and your favorite vegetables and cook up a side of rice for this delicious dish!!


Wednesday, August 19, 2015

Another weekend in the smoke


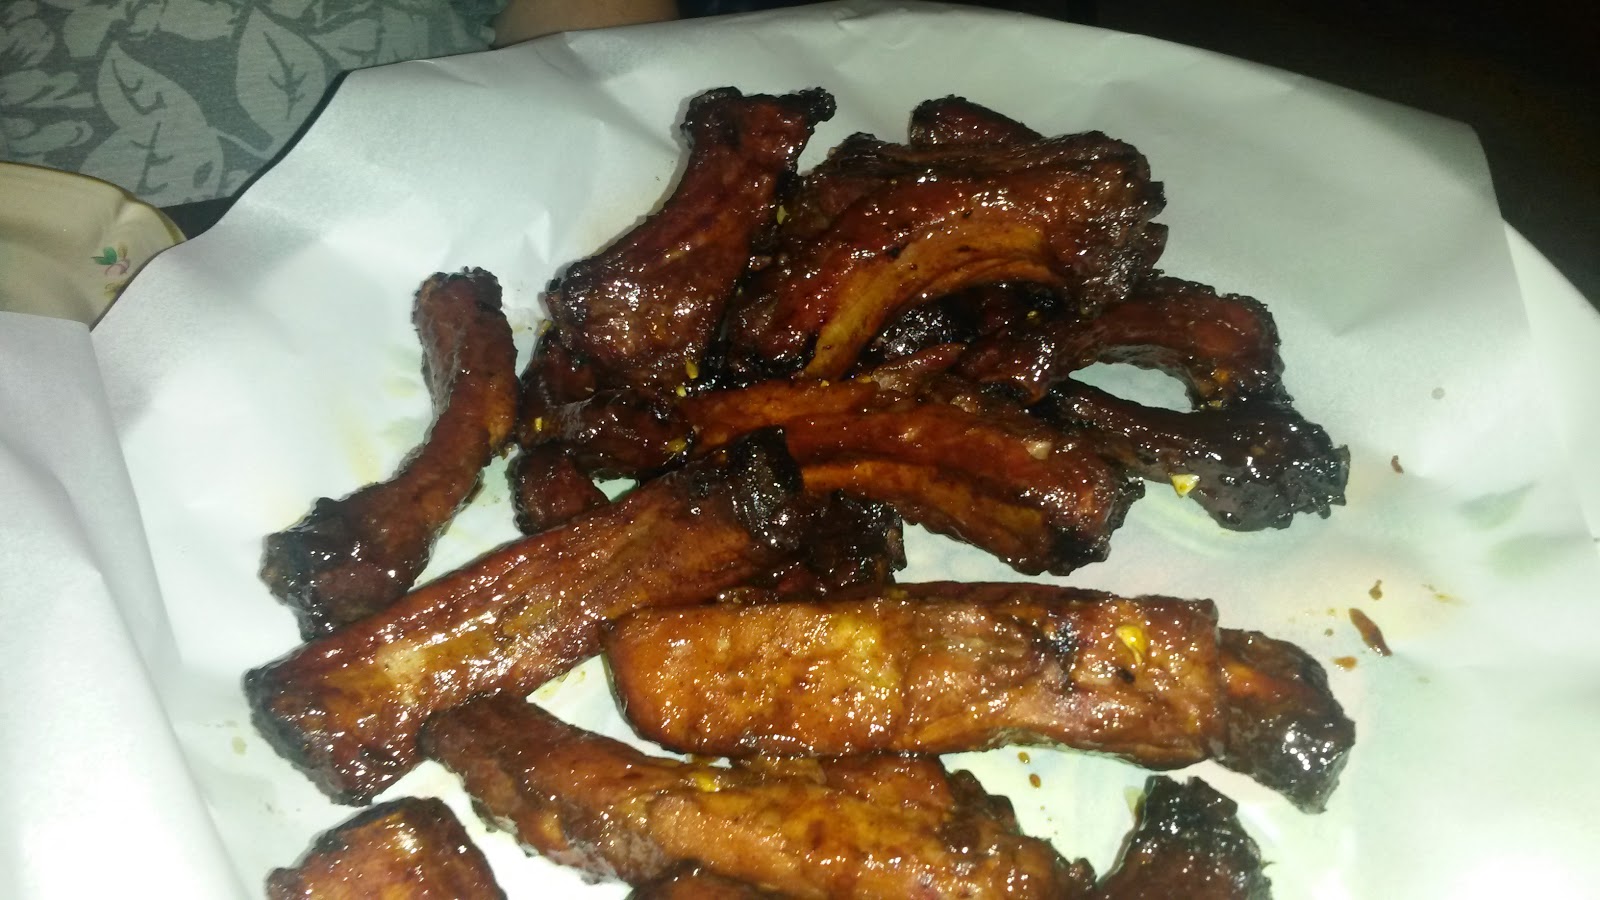
Two weeks ago we whipped up an amazing batch of sticky,sweet Asian Style Chicken Wings on the smoker. They were fantastic and the sauce told us we should try it on ribs! Not being ones to ignore when the food talks, we decided Asian Style Ribs would get bumped to the top of our "Things we HAVE to try" list. I had a couple of racks of ribs in the freezer so we made plans to try them out.
This was the first time we've cut and cooked ribs individually, rather than as full racks. The jury is still out on that method. In one respect it was nice to have the glaze and bark surround the ribs, but I think they would have been more tender if I was to leave them as a whole rack. Next time I will cook them as full racks and then cut them and finish them individually.
For Christmas my stepson got me those "As seen on TV" cooking mats. They're called Yoshi something or other and at first glance they seem like the rest of the stuff you can only buy at 2AM off the television- a novelty that ends up in next summers yard sale.  I was pleasantly surprised, however, at how well they worked for our purposes - which was basically to keep the sticky Asian style glaze off my nicely seasoned grill grates. They did NOT produce the grill marks they advertise, but that wasn't a priority so no harm no foul.

We used the same marinade/gllaze as with the Chicken Wings and it was another home run! They were just like the ribs I used to get from China Village. 


Here's how we made the glaze & marinade:


4 cloves garlic minced
Jar of apricot preserves
1/4 c hoisin sauce
1/2 c honey
1/4 c soy sauce
sesame oil 1 tbsp
1 tbsp Chinese 5 spice
Juice of 1 lemon

Toasted sesame seeds (optional for garnish)

We smoked them at about 275F with Oak & Hickory for about 2.5 hours and basted w/ glaze every 15-20 minutes after the first hour.


Tuesday, August 4, 2015

Sticky, sweet Asian Chicken Wings!


Tried out a recipe we found online this weekend for sticky sweet asian wings. This recipe calls for apricot preserves, brown sugar, hoisin sauce, soy sauce, minced ginger ,minced garlic, honey, Chinese five spice, sesame oil and lemon juice. I'll post the measurements below.

We cooked them on the grill at around 250 for two hours and basted with the glaze a couple of times towards the end. Letting those layers of glaze carmalize is what makes these Wings so tasty and look so good.

If you're a fan of Chinese take out, try these Wing.! Easy and delicious! Don't forget napkins!

Here's the list of ingredients. Don't forget to reserve a bit for basting later.

1 bag of chicken wings ( I don't know the size, its about 20-30 little wings from the frozen food section at the grocery store.)

4 cloves garlic minced
Jar of apricot preserves
1/4 c hoisin sauce
1/2 c honey
1/4 c soy sauce
sesame oil 1 tbsp
1 tbsp Chinese 5 spice
Juice of 1 lemon

(If you want heat you can add Sriracha sauce to taste.)

Mix the all the ingredients together and reserve some for glazing on the grill. Add chicken wings and marinade to a gallon ziplock bag and massage to combine. Let the wings marinate for at least 4 hours. We prefer overnight.

Place the wings right from the bag onto the grill. Baste and turn the wings after an hour and then again every 20 minutes until they're done. Chicken should be cooked to 165-170 degrees.

These Wings are fantastic! We're trying this glaze on ribs this weekend coming up! Stay tuned!

Happy Birthday 50th to the Pitmaster!!


Sunday, August 2, 2015

Grilled pizza!


Bacon, Cheddar & Potato Tart


One of our favorite things to do is comb social media for new ideas to try on the grill. Last week we discovered another brilliant concoction - the bacon, potato & cheddar tart.  For our first attempt it came out pretty darn good! We certainly learned some things to make it better next time, but all in all this is an awesome dish. Make no mistake, with almost 2 pounds of bacon and almost as much cheese, this is not a dish for the health conscious. Don't worry, we're a little health conscious ourselves, so I probably can't convince the wife to let me make one every weekend.   

We' re working on doing some videos on preparing these dishes, but for now I'll just spell it out and add some photos to give you an idea of how it looks going together.

What you'll need:

2 pounds thin sliced bacon
2 pounds cheese shredded ( we used sharp cheddar, but we're going with a more gooey cheese next time)
3-4 large russet potatoes
9 inch cake pan ( or pie tin or oven ready saute pan)
Parchment paper
Non-stick cooking spray

First things first, fire up the grill. You'll want to cook this at 225-275 for a couple of hours. The original ideo we watched suggested 2 hours at 350 degrees. in the oven, but our experience has been that bacon cooked long, low and slow will shrink less and make a much better final product.

While the fire is come up to temperature you'll need to shred your cheese and slice your potatoes. You'll want to use a sharp knife and slice the potatoes thin. In our tart we used about 3 baking potatoes and about 1 pound of cheese.


Next step is to prepare the baking dish. We learned a really cool little trick with parchment paper from the original video. The idea is to fold the paper onto itself from a single point. Check out this little video to see what I mean ( I promise the videos will get better!)


Now that you have the parchment paper cut to size, spray down the pan with cooking spray. Then place your parchment paper in the pan and smooth it out so it fits nicely.


With the parchment paper laid in place, it's time to build the bacon shell. You'll lay slices of bacon from the center of the pan to the edge and leave about 1/2 of each slice laying outside the pan.
In order to avoid a big pile of bacon in the center, it works best if you stagger the slices. In other words, lay your first slice starting at the center of the pan, then lay your next slice about 1/2 inch back from the center, then the next slice back to the center and so on and so on. You'll want to be sure the slices overlap. Basically you want the potato & cheese completely covered. No one wants cheese oozing out all over the place!


Now that your shell is mostly built, it's time to start layering potatoes & cheese. Start with a layer of sliced potatoes, covering the bottom of the pan. Next, sprinkle on some salt, pepper, garlic, seasoned salt, etc (we used seasoned salt & black pepper). After seasoning the first layer of potatoes, go ahead and spread a generous layer of shredded cheese over the potatoes.

Continue on with a layer of potatoes, seasoning and a layer of cheese and so on. Because the bacon and potatoes will shrink a bit while cooking, you will want to continue the layers over the top of the pan.


Once you've created several layers of potato & cheese you can now close up the tart. You will want to lay the bacon back over the tart the same way you did the bottom: overlap each piece and stagger them at the center (to avoid another large "pile" of bacon right in the middle. Again, be sure there are no spaces and the potatoes & cheese are completely covered by the bacon.


Once the tart is all sealed up we tossed it on the grill at around 250 degrees until the top was completely browned. You want to cook this low and slow to allow the bacon to render slowly. This will prevent the bacon from curling. Another tip to keep the bacon from curling is to place a small plate or saucer on top during the cooking process. Once the bacon turns brown you can remove it.


Once the top is browned to your liking (should take an hour or so), you'll find the pan needs to be drained. We used a cookie sheet and cooling rack and simply flipped the tart over onto the cooling rack and put it back on the grill to brown the bottom. We added the plate to it again, but that didn't work so well. I'm pretty sure the problem was we ramped up the grill temp (it looked really good and we were hungry!!). Once again, I am reminded that bacon really needs to be cooked slowly.


After another hour or so the bottom should be browning nicely. At this point you'll want to start checking the potatoes for done-ness. We used a wooden skewer, but a toothpick should work just fine.

Leave the tart on until the potatoes are fully cooked.

Once the potatoes are fully cooked and the bacon is browned to your liking, simply remove it from the grill and let it stand for 15-30 minutes. Then slice it like a pie and enjoy!!


As you can see, the top (or bottom?) shrunk away from the center a bit, but I beleive that was because of the higher heat cooking the bacon faster & rendering the fat out too quickly. We'll go slower next time.


Both Leslie and I loved this dish! It is definitely not for those on a health kick, but if you like bacon (or cheese or potatoes!) you'll love it!


This recipie is highly customizable too. You can substitute your favorite cheese (I think you'll be happy with cheeses that like to be melted.). You could add onions or jalapenos for another layer of flavor and/or heat. The possibilities are endless!.


Try it yourself and let us know what you think!